
CB Advanced Backend Tutorials
Welcome to our advanced tutorials on how to use the open source ChainBuilder software. Below are a few of the many different types of models that can be created with the ChainBuilder software. The tutorials assume some background knowledge of the ChainBuilder software.
If this is your first time using the ChainBuilder software, please review the Basic Tutorials first.:
Button Model |
Scenario Model
Button Model
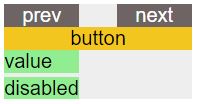
The Button Model allows the user to control exactly when a model should start to run. Normally, ChainBuilder will run models automatically, each time inputs are altered. By adding a button to your model, you can interrupt the connection between the inputs and the workflow. This is especially helpful if the user must alter multiple inputs before running the model.
- Create or Open a Dashboard.
- Create or Open a Project. Navigate to your Project Editor.
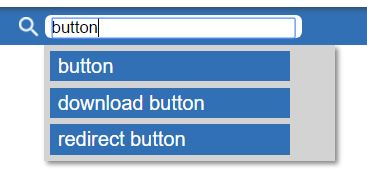
- Search for the “button” widget. Drag-and-drop to add the button to your Editor.
- Add all the other widgets needed for your model to run, including your input widgets, data processing widget, and output widgets using the same search, then drag-and-drop method.
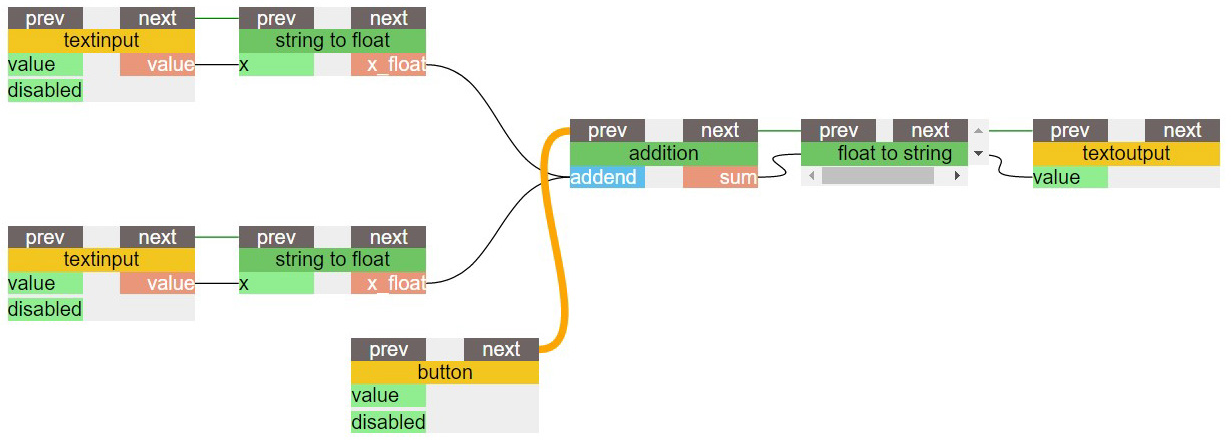
- Create the data workflow for your model by connecting each of the widgets, except for the button using the (black) data workflow lines at the bottom of the widgets.
- Create an (green) execution workflow that only connects the tops of widgets involved with model inputs.
- Create an (green) execution workflow that only connects the tops of widgets involved with the model processing and outputs.
- There should be green execution connection between the model input widgets and the model processing and model output widgets. Add the button widget in this gap. Connect the “next” handle of the button widget to the “prev” handle of the model processing widget or model output widget that starts the process that creates the model outputs.
- Add each of the yellow widgets that your user will need to manipulate to your desired Dashboard. To do this, right click on each of the widgets, select the desired dashboard under the “Add to Dashboard” dropdown, and click “Apply Selection.”
- Navigate to the Dashboard to use the button model. You may need to right-click, enter setup mode and move each of the model components before the model is usable. You may also complete other visual design steps within the Dashboard.
Steps:
For more detailed instructions, please refer to our tutorial on building the Example Button Model for adding two numbers.
Additionally, a finished version of the model described here is avaliable in the demo version of ChainBuilder at www.chain-builder.net/demo.
Scenario Model
The Scenario Model allows you to save specific inputs into a named group. Once the group of inputs is saved, it can be re-accessed at a later time. This is especially helpful if there are a limited number of possibilities you would like to compare. This may also be helpful if you want to prepare the model to run in a specific way for a presentation.
There are three steps: 1. Create the base model, without scenario capabilities 2. Create a workflow for scenarios 3. Assign input parameters to scenarios.
Part 1: Base Model, Steps:
- Create or Open a Dashboard.
- Create or Open a Project. Navigate to your Project Editor.
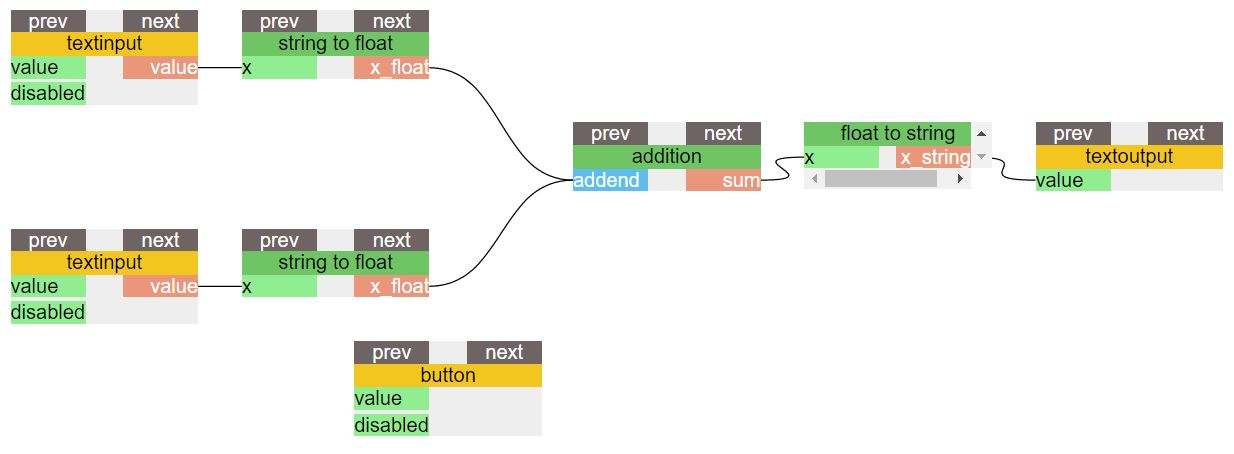
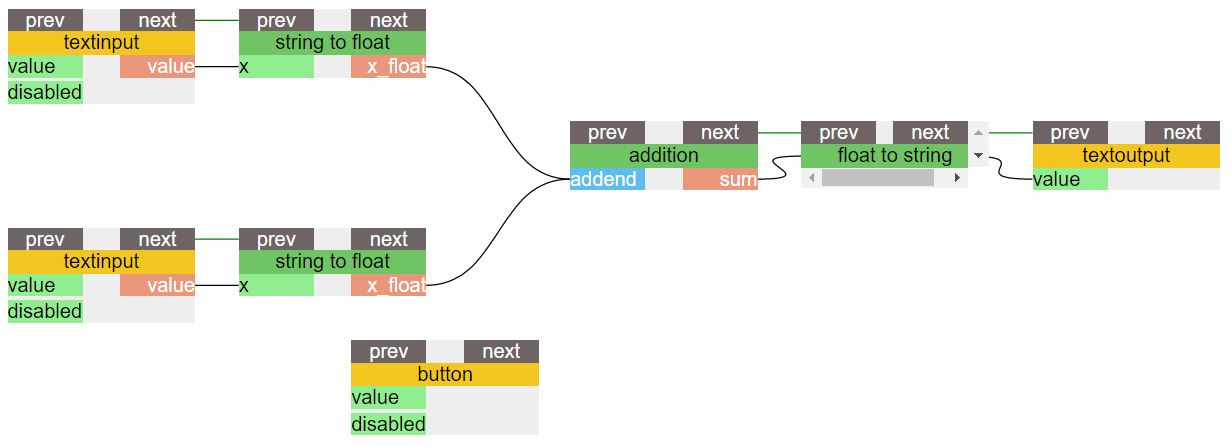
- Add all of the widgets needed for the model to perform the function you would like it to, independent of scenario saving. For the purposes of this tutorial, we will be creating an addition model that accepts two numerical inputs and generates the sum for users. To do this, search for, then drag-and-drop:
- Input widgets: 2 “textinput”, 2 “string to float”
- Data processing widget: 1 “addition”
- Output widgets: 1 “float to string”, 1 “textoutput”
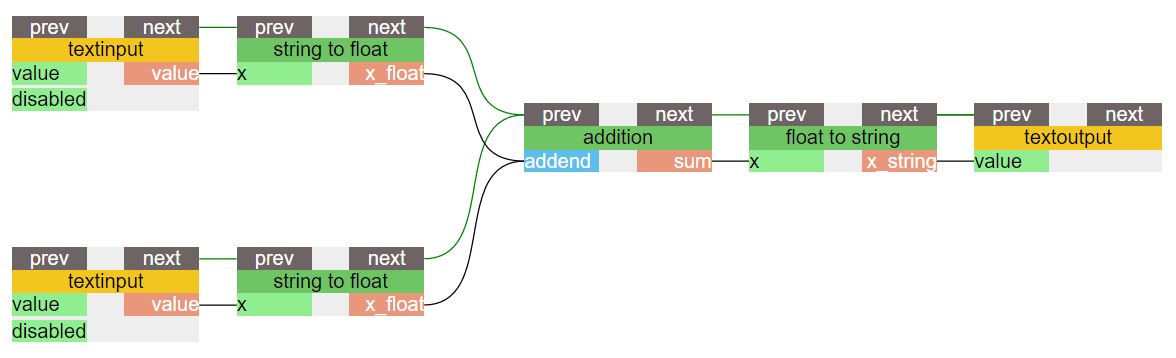
- Create the data and execution workflow for your addition model by connecting each of the widgets, using the (black) data workflow lines and (green) execution workflow lines at the top and bottom of the widgets.
- Add each of the yellow widgets that your user will need to manipulate to your desired Dashboard. To do this, right click on each of the widgets, select the desired dashboard under the “Add to Dashboard” dropdown, and click “Apply Selection.”
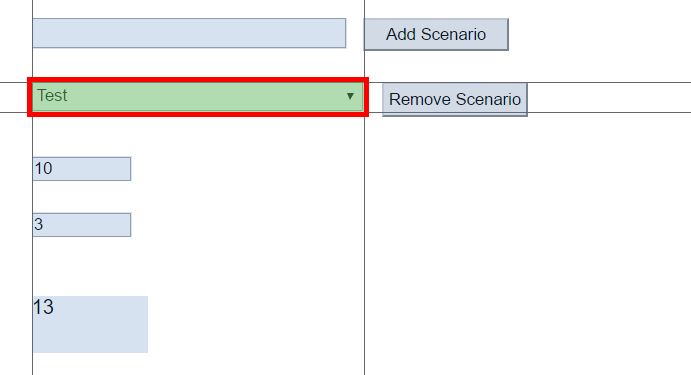
- Navigate to your Dashboard. Right-click, enter setup mode and move each of the model components to make the model usable, following the image provided. You should have the two textinput boxes on the left and the box that displays the sum on the right. At this time, you may text the model to make sure that it adds inputs correctly.
- Add each of the yellow widgets (the textinput, button, and textoutput widgets) to the Dashboard you created earlier.
Part 2: Scenarios Workflow, Steps:
- Return to the Editor and search for the widgets needed on the dashboard for a scenario model. Drag-and-drop to add the button to your Editor, and then rename the widgets by right-clicking and then editing the "Module Name" as follows:
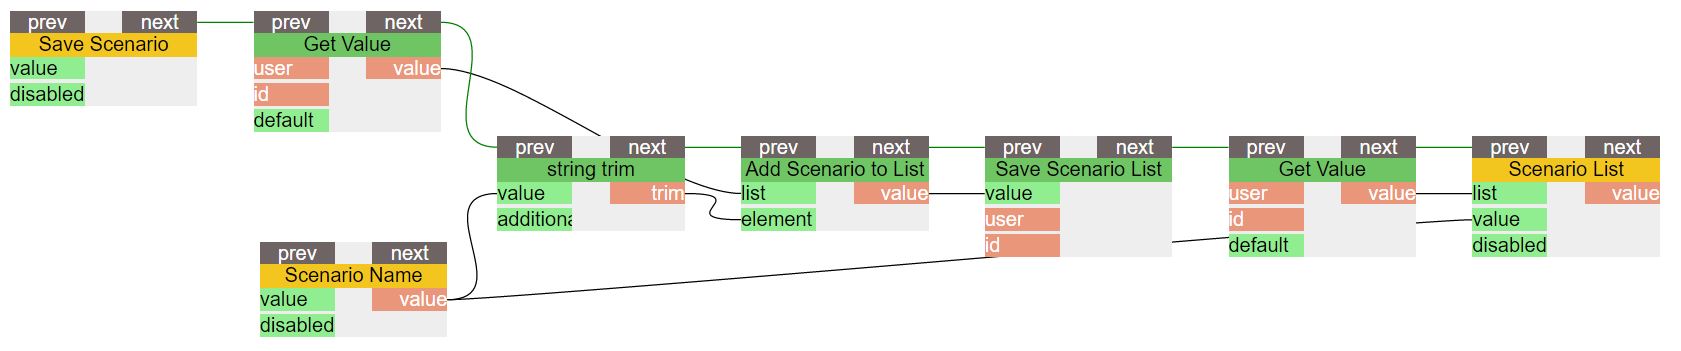
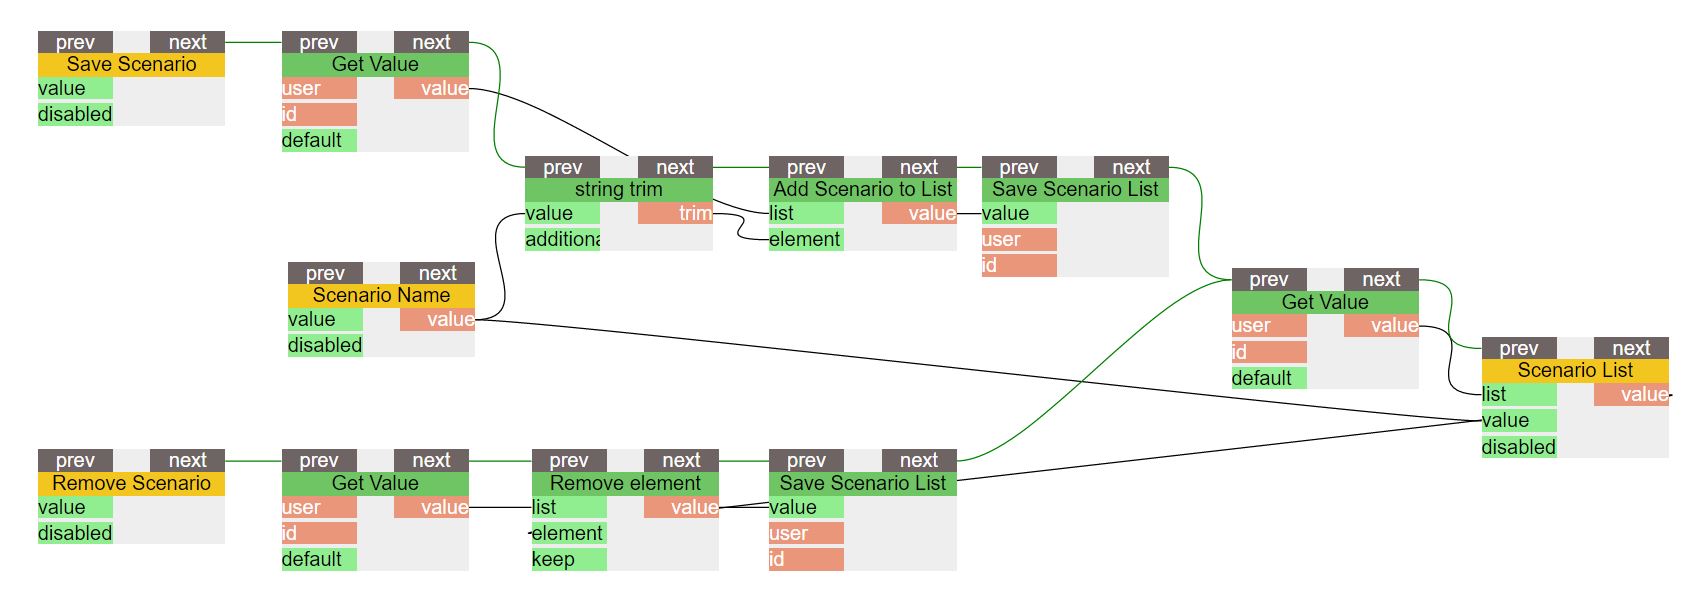
- Dropdown (Stores a list of all the stored scenarios) - Rename as "Scenario List"
- Text input (Inputs the scenario name) - Rename as "Scenario Name"
- (2) Buttons (Directs the workflow) - Rename as "Save Scenario" and "Remove Scenario"
- Change the values of the Buttons by right clicking on the "value" handle of the buttons, editing the text, and hitting "Enter":
- Save Scenario: enter "Add Scenario"
- Remove Scenario: enter "Remove Scenario"
- Add the following widgets that are needed to save new scenarios and rename widgets as specified:
- (2) Get Value: Gets the scenario names from the scenario data store
- Add Element: Appends the new scenario name value to the value obtained by ‘Get Value’
- Rename as "Add to Scenario List"
- Set Value: Stores the comma separated value into the scenario data store
- Rename as "Save Scenario List"
- String trim: Trims the spaces at the start or the end of a scenario name
- Set up the data and execution workflows to save new scenarios by connecting the handles on the widgets
- Using the green data lines, connect:
- "Save Scenario" to "Get Value" to "string trim" to "Add Scenario to List" to "Save Scenario List" to "Get Value" to "Scenario List"
- Using the black execution lines, connect:
- "Scenario Name, value" to "string trim, value"
- "Scenario Name, value" to to "Scenario List, value"
- "string trim, trim" to "Add Scenario to List, element"
- "Add Scenario to List, element" to "Get Value, value"
- "Add Scenario to List, value" to "Save Scenario List, value"
- Using the green data lines, connect:
- Add the following widgets that are needed to remove scenarios and rename widgets as specified:
- Get Value: Gets the scenario names from the scenario data store
- Remove Element: Removes the current element i.e., scenario from the value obtained by ‘Get Value’ module
- Set Value: Stores the comma separated value into the scenario data store
- Rename as "Save Scenario List"
- Set up the data and execution workflows to remove scenarios by connecting the handles on the widgets
- Using the green data lines, connect:
- "Save Scenario" to "Get Value" to "Remove Element" to "Save Scenario List" to "Get Value" to "Scenario List"
- Using the black execution lines, connect:
- "Get Value, value" to "Scenario List, list"
- "Add Scenario to List, element" to "Get Value, value"
- "Add Scenario to List, value" to "Save Scenario List, value"
- Using the green data lines, connect:
- Enter an argument for the "user" and "id" parameters of each of the three
"Get Value" widgets. This is done by right-clicking the parameter and then entering a string. Each of the arguments entered for "user" should be the same, and each of the arguments entered for "id" should be the same.
Part 3: Input Parameters, Steps:
- Return to the Editor and search for the widgets needed to assign input parameters. Drag-and-drop to add the button to your Editor.
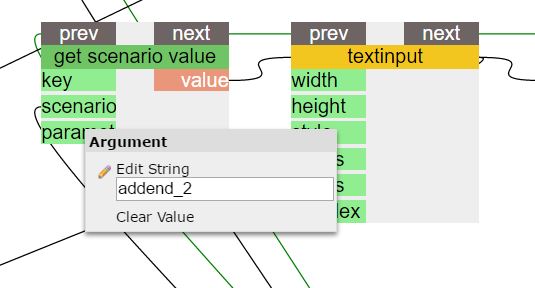
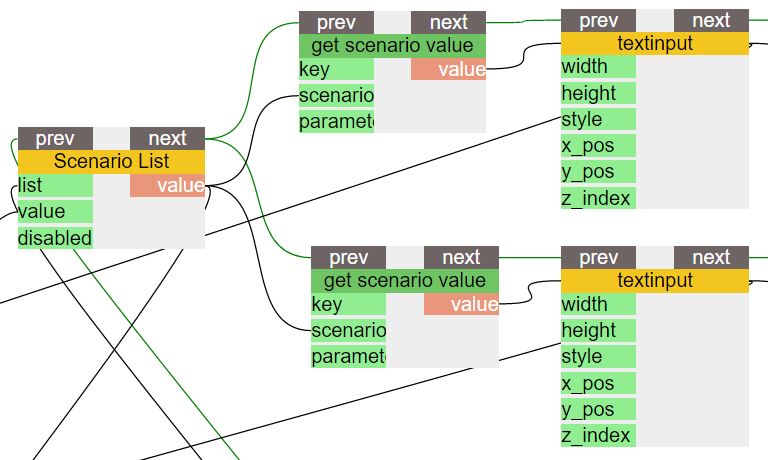
- (2) add scenario value: Takes in the parameter value for a particular scenario and stores it in the data store
- (2) get scenario value: Used to load the parameter values after the scenario is selected from the scenario list dropdown
- Enter an argument for the "key" and "parameter" parameters of each of the two "get scenario value" widgets AND each of the two "add scenario value" widgets. This is done by right-clicking the parameter and then entering a string.
The arguments for "key" should both be the same. The arguments for "parameter" should be different and based on which textinput in the addition model the widget is connected to. For example, each of the "add/get scenario value" widgets connected to the first "textinput" should have the "parameter" "addend_1" while each of the widgets connected to the second "textinput" should have the "parameter" "addend_2." - Connect the "get scenario value" widgets to the addition model, save scenario mode, and remove scenario model using the handles on the tops and bottoms of the widgets. You may need to remove the widgets from the "Scenario Model" dashboard to access the bottom handles and then readd them to the dashboard once you have made your connections.
- Connect the green data handles on the top of the widgets as follows:
- Connect each "get scenario value" to the the "Scenario List" widget
- Connect each "textinput" widget to a seperate "get scenario value" widget
- Connect the black data handles on the bottom of the widgets as follows:
- Connect each "scenario" handle on the "get scenario value" widget to the to the "value" handle on the "Scenario List" widget
- Connect each "value" handle on the "get scenario value" widget to a left-hand "value" handle on the corresponding "textinput" widget using the same pairings you used in the earlier step
- Connect the green data handles on the top of the widgets as follows:
- Connect the "add scenario value" widgets to the addition model, save scenario mode, and remove scenario model using the handles on the tops and bottoms of the widgets. You may need to remove the widgets from the "Scenario Model" dashboard to access the bottom handles and then readd them to the dashboard once you have made your connections.
- Connect the green data handles on the top of the widgets as follows:
- Connect each "add scenario value" to the "string trim" widget
- Connect the black data handles on the bottom of the widgets as follows:
- Connect each "scenario" handle on each "add scenario value" widget to the "trim" handle on the "string trim" widget
- Connect each "value" handle on each "add scenario value" widget to a right-hand "value" handle on the corresponding "textinput" widget using the same pairings you used earlier
- Connect the green data handles on the top of the widgets as follows:
- Navigate to your Dashboard. Right-click, enter setup mode and move each of the model components to make the model usable, following the image provided. You should have the a new textinput box that allows you to enter a name for any new scenarios you create, a dropdown where the list of scenarios will be stored, a "add scenario" button, a "remove scenario" button.

For more detailed instructions, please refer to our tutorial on building the Example Scenario Model for adding two numbers.